Indexing
A good index contains all
substantive discussions of concepts, including subentries and
cross-references in addition to the major concepts listed in the Table
of Contents. A professional indexing service will charge $3 to $5 per page, depending on the complexity.
An index can be produced two ways.
-
Manually:
When you have finished proofing the final book PDF file, it can be sent to
the indexer (or you may do it, if you feel confident in your own
ability). The indexer will do his/her work and provide a text file
containing a list of topics with their page numbers. This file will be
added to the end of the final InDesign book file, then a final
print-ready PDF will be produced for printing.
The main drawback to this method is that the page numbers are static,
so they would have to be re-numbered manually should pagination change
for whatever reason (such as last minute changes that will shift text).
-
In MS Word:
The index can also be produced by inserting index markers (by you or
your indexer) directly into the final Word manuscript. The invisible
markers are placed adjacent to the words to be indexed throughout the
manuscript. When I convert your Word manuscript into my InDesign
program for book layout, the index can then be generated automatically
with correct pagination even when pages are shifted during formatting
and when making review changes later.
This method is the more commonly used now, and although it requires the
work to be done before formatting begins, it can potentially save the
need to re-do a manually-produced index, should that need arise.
(Note: indexers who are familiar with InDesign can use method 2. to insert index markers directly into the InDesign file.)
If method 2. is to be used (placing index markers into the final Word manuscript), there are basically three ways to do it:
1. Mark the individual words and phrases to be indexed within the final Word manuscript (the most often used and generally considered the best method)
- To use existing text as an index entry, select (highlight) the
text. To enter your own text as an index entry, click where you want to
insert the index entry.
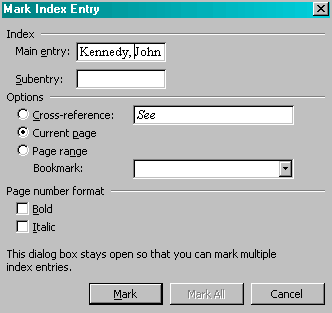
- Press ALT+SHIFT+X.
- To create the main index entry, type or edit the text
in the Main entry box. You can customize the entry by creating a
subentry or by creating a cross-reference to another entry.
NOTES
- To include a third-level entry, type the subentry text followed by a colon (:) and then type the text of the third-level entry.
- If you want to use a symbol, such as @, in the
entry, type ;# (semicolon followed by the number sign) immediately
following the symbol.
- Since the index will be converted later by your book designer, there is no need to deal with formatting issues here.
- To mark the index entry, click Mark. To mark all occurrences of this text in the document, click Mark All.
- To mark additional index entries, select the text, click in the Mark Index Entry dialog box, and then repeat steps 3 through 5.
2. Mark entries for text that spans a range of pages
- Select the range of text you want the index entry to refer to.
- On the Insert menu, click Bookmark.
- In the Bookmark name box, type a name, and then click Add.
- In the document, click at the end of the text you marked with a bookmark.
- Press ALT+SHIFT+X.
- In the Main entry box, type the index entry for the marked text.
- Again, no need to deal with formatting issues here
- Under Options, click Page range.
- In the Bookmark box, type or select the bookmark name you typed in step 3.
- Click Mark
3. Automatically mark entries by using a concordance file(
A concordance is a list of key terms in a document and the page
numbers on which those terms appear. This tool has no cross-references,
subentries, hierarchy, or other indicators of content. It is merely a
list of words followed by long lines of page numbers. This is not a
readily accepted method, since it may produce an index with
superfluous entries).
- Create a concordance file.
- Click Insert Table Button image on the Standard toolbar.
- Drag to select two columns.
- In the first column, enter the text you want
Microsoft Word to search for and mark as an index entry. Make sure to
enter the text exactly as it appears in the document. Then press TAB.
- In the second column, type the index entry for
the text in the first column. Then press TAB. If you want to create a
subentry, type the main entry followed by a colon (:) and the subentry.
- Repeat steps 3 and 4 for each index reference and entry.
- Save the concordance file.
- Tip:To make sure Word marks all the text you want
to index, list all forms of the text you want to search for. For
example, type erupt, erupting, and eruption in three separate cells in
the left column, and then type volcanoes in the matching cells in the
right column.
- Tip:To speed up the creation of a concordance
file, first open both the concordance file and the document you want to
index. To see both documents at once, click Arrange All on the Window
menu. Then copy text from the document you want to index into the first
column of the concordance file.
- Open the document you want to index.
- On the Insert menu, point to Reference, click Index and Tables, and then click the Index tab.
- Click AutoMark.
- In the File name box, enter the name of the concordance file you want to use.
- Click Open.
NOTE 1: Word searches through the document for each exact occurrence of
text in the first column of the concordance file, and then it uses the
text in the second column as the index entry. Word marks only the first
occurrence of an entry in each paragraph.
NOTE 2: Microsoft Word inserts each marked index entry as an XE (Index
Entry) field in hidden text format. If you don't see the XE fields,
click Show/Hide Paragraph mark Button image on the Standard toolbar.
At this point your MS Word document/manuscript will have all your desired index entries marked throughout the text as XE(index entry). This is all your book designer will need to produce an index in your formatted book.
It's not necessary, but if you wish to see what entries your index will contain,
you can generate one for yourself to view. It will also offer you an
opportunity to see if there are errors in your entries that you may
wish to correct before submitting your manuscript to your book designer. Here are the steps required to do it.
- Click where you want to insert the finished index.
- To make sure that the document is paginated
correctly, you need to hide field codes and hidden text. If the XE
(Index Entry) fields are visible, click Show/Hide Paragraph mark Button
image on the Standard toolbar.
- On the Insert menu, point to Reference, click Index and Tables, and then click the Index tab.
- Click a design in the Formats box to use one of the available designs.
- Select any other index options you want.
- To update the index, click to the left of the field and press F9.
- Don't modify index entries in the finished index; if you do, your changes will be lost when you update the index.
- If you create an index in a master document, expand the subdocuments before you insert or update the index.
Creating an Index in Word
by Susan C.
Daffron
Most long documents have an index. An index lists the
ideas, topics, and terms discussed in the tome, so people can find the
information they seek more easily. The good news is that adding an
index to your document makes it vastly more useful to your readers. The
bad news is that creating an index is a time-consuming and potentially
challenging process. Although Microsoft Word includes the tools you
need to create an index, the usefulness of the end product depends more
on the person creating the index than on Word itself.
Know Thy Document
Before you start in on the mechanics of dealing with the
index in Word, think about your document. If you are the author, it can
be helpful to keep a list of terms and concepts off in a list somewhere
as you are writing. If you aren’t the author, it’s helpful to just
print out the document first and highlight potential index entries.
The goal is to gather up a lot of of the terms you’ll
enter into the index. Look for nouns for subject entries and verbs for
procedural information. You’ll notice that for procedures, most indexes
use the -ing form of the verb, such as “copying files” rather than
“copy files.”
After you have a list of words, think of synonyms and
ways people might look up the information. Those can be “see also” type
entries like “how to copy files, see deleting files” or “making copy of
files, see deleting files.”
Add Entries
In Word, creating an index is a two-step process. First
you add the entries throughout the text and then secondly, you generate
the index itself. The second step is not required if you are sending
the document to a designer who will generate the index to suite the
book design. It's a good idea to generage the index, though; it will allow you to see all the mistakes you've made!
Word goes through the document and collects the entries
into a list with the page numbers. If you’ve read the online help, you
may have read about creating a “concordance file” that automatically
marks index entries. It sounds like it would be a cool thing, but
generally it’s more trouble than it’s worth because it’s essentially a
giant search activity. Only a human can determine when terms are
contextually relevant.
For example, suppose you have a book about dog training.
You might have an entry that points to a section on dealing with
problem barking. If you did a concordance, Word would go through and
find every time you used the word bark or barking. Now consider how
many entries it would find that aren’t relevant. Dogs bark for a lot of
reasons. Deleting all the entries the concordance marked incorrectly is
probably more work than just doing the index entries in the first place.
The XE Field
To create indexes, it helps to spend some time learning
about fields. You use the Index Entry (XE) field to mark the text you
want to incorporate into the index. This situation is one where you
really should learn the keyboard shortcut. (The menu item is so deep
it’s absurd.) So to mark entries, follow these steps:
1. Highlight a word or words you want to add as an index
entry. Or you can enter different text by placing the insertion point
where you want the XE field code.
2. Press Alt+Shift+X. The Mark Index Entry dialog box
appears.
3. If you highlighted text, it appears in the Main Entry
box. Otherwise, type your first-level index entry text. You also can
type a second-level entry in the Subentry box. If you need a
three-level index, you can follow the subentry text with a colon and
type the third-level entry text.
4. Click Mark. The Mark Index Entry dialog box stays
open, so you can add more entries.
The way you add your index entries affects how they
appear in the index. For example, if you put Kennedy, John in the Main
Entry field, you’d end up with an index entry that looks like this:
Kennedy, John, 7
You can create each entry individually and just ignore
the subentry field if you want. When you show field codes, you see that
the field looks like {XE “Kennedy,John”} in the text. Note that the
comma in there is the one you typed in.
However, if you put Kennedy in the Main Entry Field and
John in the Subentry field, you get:
Kennedy
John, 7
If you add entries for other Kennedys such as Robert and
Rose too, together they’d look like:
Kennedy
John, 7
Robert, 9
Rose, 10
The fields you see in the text would be {XE
“Kennedy:John”}, {XE “Kennedy:Robert”}, and {XE “Kennedy:Rose”}. Note
that the last name and first name are separated by a colon. When you
use the subentry field, you need to be careful that the text in the
main field is exactly the same for similar entries. For example, in
this case, if you spelled Kennedy wrong in an entry, you’d get an extra
entry with the misspelling. Misspellings can be really subtle too. The
entries must match exactly. You can’t have extra spaces or change the
case. Word treats “rose” and “Rose” as two different entries. And “Rose
Kennedy” (one space in between the words) is not the same thing as
“Rose Kennedy” (two spaces in between the words).
As soon as you begin marking entries, Word shows field
codes and hidden text, so you can see what’s going on and make sure you
have entered the entries correctly. XE “fred”
However, it’s sort of confusing because showing the index entries
actually expands out your document, so the page numbers may seem wrong.
Be sure you hide field codes and hidden text before you generate your
index. Choose Tools|Options and in the View tab, remove the checkmarks
next to Field codes and Hidden Text.
Generate the Index - if you want to
This step is not required if you are sending the
document to a designer who will generate the index to suite the book
design, but it may be quite helpful in identifying any errors you may
have made with your entries.
After you have defined all your index entries, you are
ready to generate your index. In a short document, you can just add the
INDEX field at the end of the document by choosing Insert|Index and
Tables or Insert|Reference| Index and Tables, depending on your version
of Word.
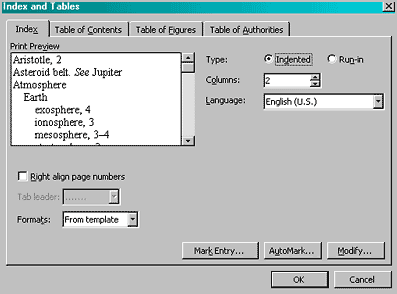
You can choose from an Indented (sometimes called
“nested”) or a Run-in Index. Basically, the Indented index looks
somewhat like an outline.
Dogs
allergies (see also skin and coat)
contact dermatitis 228-229
flea-bite sensitivity 227-228
food allergies 227-228
In contrast, a run-in index appears in a paragraph
format like so:
Dogs: allergies, 129; breeds, 188;
difference from cats, 210; housebreaking, 300
After you generate the index, it’s virtually guaranteed
that you’ll find mistakes. So you need to go back and change the
entries that have problems. Although it’s tempting, don’t edit your
generated index. If you regenerate the index, your changes disappear.
So you need to go back and edit the entries directly.
To edit the entries, you need to have hidden text
showing. You can modify the index entry text directly by changing the
text inside the quotation marks. If hidden text isn’t showing press
Ctrl+Shift+8 or press the Show/Hide button on the Standard toolbar,
which is the one that looks like a paragraph icon. With hidden text
showing, you also can use Word’s Search feature to find a particular
entry. Press Ctrl+F and click the More button. Click Special and then
select Field. You’ll see that ^d appears in the Find What box. If you
have other types of fields in your document, put ^d X into the box and
it will hop to the next field that starts with X. (And it’s probably an
XE index entry field!) If you know the entry name, add it too in
quotes, such as ^d XE “storm”.
If you want to delete an entry entirely, you have to
delete the entire field code. Select the entry including the braces and
press the Delete key.
After you make your changes, regenerate your index by
clicking in it and pressing F9 to update fields.
If you don’t like how your index looks from a formatting
standpoint, you can change the built-in Index 1 through Index 9 styles
so they match your document. This process is much like editing the
Table of Contents styles. The styles correspond to the index level.
|
|